Get started guide
Step-by-step guide to setting up your Sapher Shield browser extension

For desktop: Step-by-step guide to setting up your
Sapher Shield browser extension.

STEP 1:
Go to Sapher.com
- Open your browser and navigate to Sapher.com
- Click the "Protect me now" button, typically located at the top right of the homepage.

STEP 2:
Sapher plans and pricing
- Scroll down to the Sapher plans and pricing section to the ‘Free trial subscription’
- Choose your preferred browser.
*Please note we will be using Google Chrome in this guide

STEP 3:
Getting Sapher Shield
- Once you have chosen your preferred browser you will be taken to the relevant Sapher Shield extension store.
- Click the ‘Add to’ button typically located at the top right of the page.

STEP 4:
Getting Sapher Shield
- Click the Add extension button and the extension will start downloading.

STEP 5:
Create a Sapher Shield account
- You will be presented with a Successfully installed page. Click "Get started" to create your account.

STEP 6:
Create a Sapher Shield account
- Complete the signup form and click Submit.

STEP 7:
Verify your email
- If you signed up using your email, you will receive a verification email.
- Open the email and click the verification link to confirm your account

STEP 8:
Access the account dashboard
- Once verified, you’ll be redirected to your personalised Sapher dashboard, where you can explore the different features.
- If you have a gift code, jump forward to Step 16.

STEP 9:
Activating & using the Sapher Shield extension
- Pin Sapher to your browser so you'll know at a glance if sites are safe.
- Click on the small puzzle piece icon.

STEP 10:
Activating & using the Sapher Shield extension
- Where you see Sapher Browser Extension, click the pin image. The Sapher icon will now remain on your browser.

STEP 11:
Activating & using the Sapher Shield extension
- Click on the pinned Sapher Shield icon to login.

STEP 12:
- When you visit a website, look for a green tick icon. This means we've checked the site and it’s safe to use.

STEP 13:
- If you see a red exclamation mark, be cautious. This means we've detected something potentially unsafe about the website.

STEP 14:
- Even if you get an alert, you can still visit the site if you're sure it's safe, or click avoid to go back. We're here to inform, not restrict.

STEP 15:
- Found a site you use often that we've flagged? No problem! You can mark it as trusted, and we won't alert you again.

STEP 16:
Navigate to the gift code redemption section
- On the dashboard, find the “Membership” section. This is located on the left hand side of the dashboard.
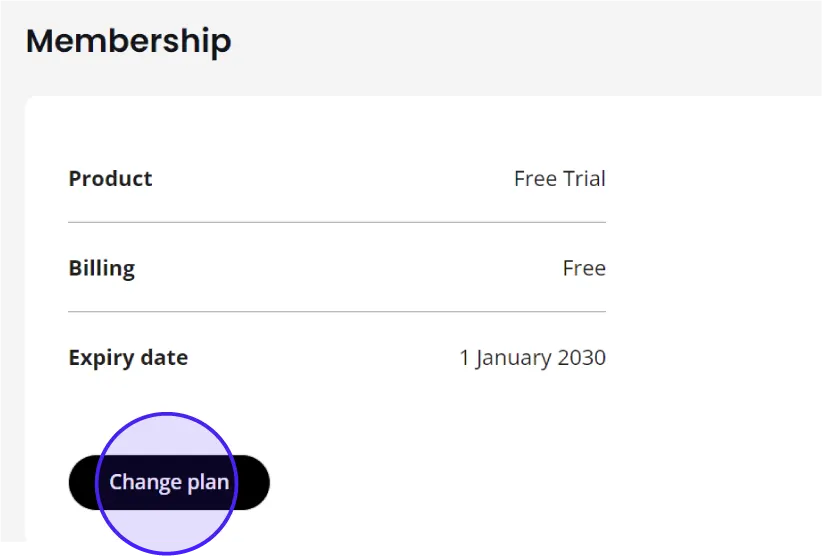
STEP 17:
Redeem your code
- On the dashboard click the “Change Plan” button.

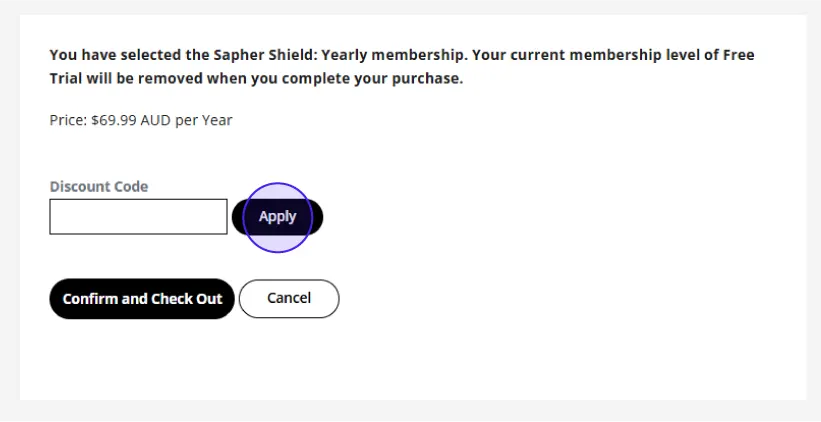
STEP 18:
Redeem your code
- Tap the “select” button for the yearly subscription.

STEP 19:
Redeem your code
- Select the "click here to enter your discount code".

STEP 20:
Redeem your code
- Enter your code in the “discount code” box and select apply.
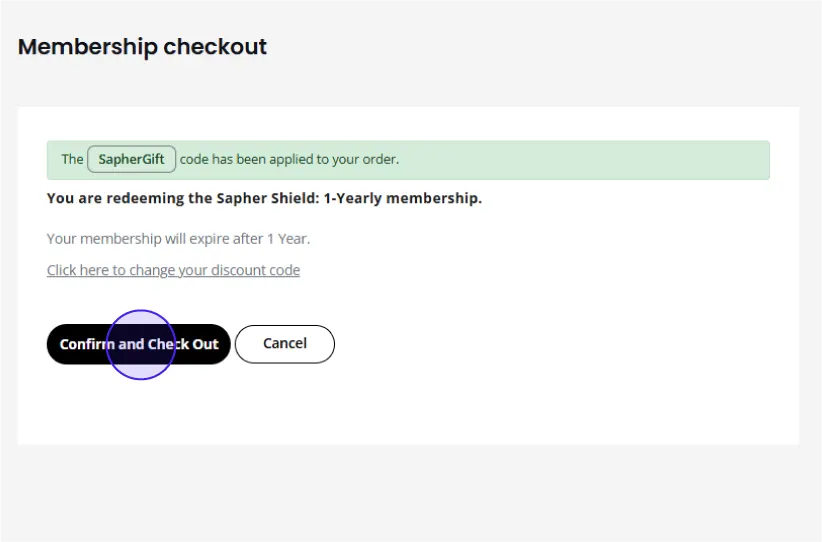
STEP 21:
Redeem your code
- That's it, your all set to enjoy Sapher benefits.
STEP 22:
Redeem your code
- Type in your unique gift code in the designated field.
- Click the "Apply Code" button to activate your benefits.
- Once the code is successfully applied, you will see a confirmation message indicating that your gift code has been redeemed.
- The additional features or discounts associated with your gift will be activated immediately.

STEP 23:
Enjoy your Sapher benefits!
- Explore your dashboard to see the newly unlocked features.
- Begin using Sapher’s powerful protection tools and check out your real-time notifications about potential online threats.
Click the right arrow button to go to the next step. Click the back arrow to go back to the previous step.
If you’re having any issues please reach out to our support team here.